バックラッシの件以来がっくりしまくっていたファームウェアの書き換えですが、なんとか原因を突き止め(と言うのはちょっとおこがましい)ました。
分かってしまえば「なーんだ」と言うか、「書いてあるじゃん」という所でした。
新品のATmega644Pに書き込むと
・X軸が片方向(+方向)にしか動かない
・リミットスイッチが効かない(で、Z軸のストッパを破壊する)
という恐ろしい事態になりました。
まったくそのままのことが書いてありました。
http://reprap.org/wiki/Sanguinololu#644P_Fuse_Settings
Fuse Settings
The fuses for the atmel chip must be changed from the default factory settings to disable JTAG.
Symptoms of incorrect fuse settings:
X axis only moves in one direction.
Endstops do not work.644P Fuse Settings
The settings come from the bootloaders boards.txt file.
Example using avrdude and usbtiny.
avrdude -B 8 -patmega644P -c usbtiny -U lfuse:w:0xFF:m -U hfuse:w:0xDC:m -U efuse:w:0xFD:m
WindowsのAVR Studioをインストールしてfuseビットをチェックしてみたところ、新品と動いている644Pでは違う値でした(左が新品、右がSolidoodleに付いていたATmega644PのFuseビット)。
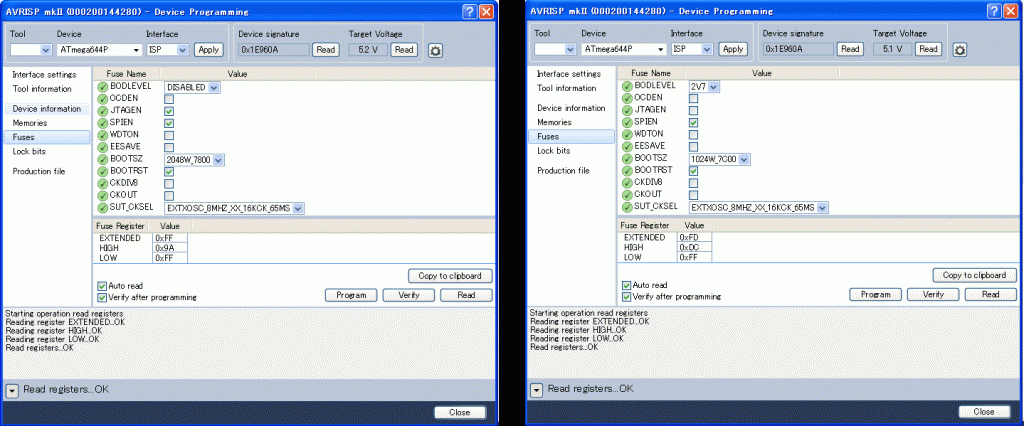
まあ、上のサイトに書いてあるとおりです。スミマセン。
標準?のboards.txtには
############################################################
atmega644.name=Sanguino W/ ATmega644P
atmega644.upload.protocol=stk500
atmega644.upload.maximum_size=63488
atmega644.upload.speed=57600
atmega644.bootloader.low_fuses=0xFF
atmega644.bootloader.high_fuses=0x9A
atmega644.bootloader.extended_fuses=0xFF
atmega644.bootloader.path=atmega
atmega644.bootloader.file=ATmegaBOOT_168_atmega644p.hex
#atmega644.bootloader.file=ATmegaBOOT_644P.hex
atmega644.bootloader.unlock_bits=0x3F
atmega644.bootloader.lock_bits=0x0F
atmega644.build.mcu=atmega644p
atmega644.build.f_cpu=16000000L
atmega644.build.core=arduino
atmega644.build.variant=standard
##############################################################
とありますので、恐らくコレは
atmega644.bootloader.low_fuses=0xFF
atmega644.bootloader.high_fuses=0xDC
atmega644.bootloader.extended_fuses=0xFD
あたりが適当な気がします。Sanguinololuで使う場合は(はい、書いてありますね)。
ということで、バックラッシ、解決出来ればいいなぁ。。